UPDATED OCTOBER 2026 | BEGINNER GUIDE | ELECTRIC, HAND AND MINI MACHINES
How to Wind a Bobbin
Knowing how to wind a bobbin is the first skill every new sewer needs, because a badly wound bobbin causes loose stitches, tangles and thread breaks. This guide shows bobbin winding step by step on electric, hand-operated and mini machines, and how to fix the common problems.
Quick Answer: How Do You Wind a Bobbin?
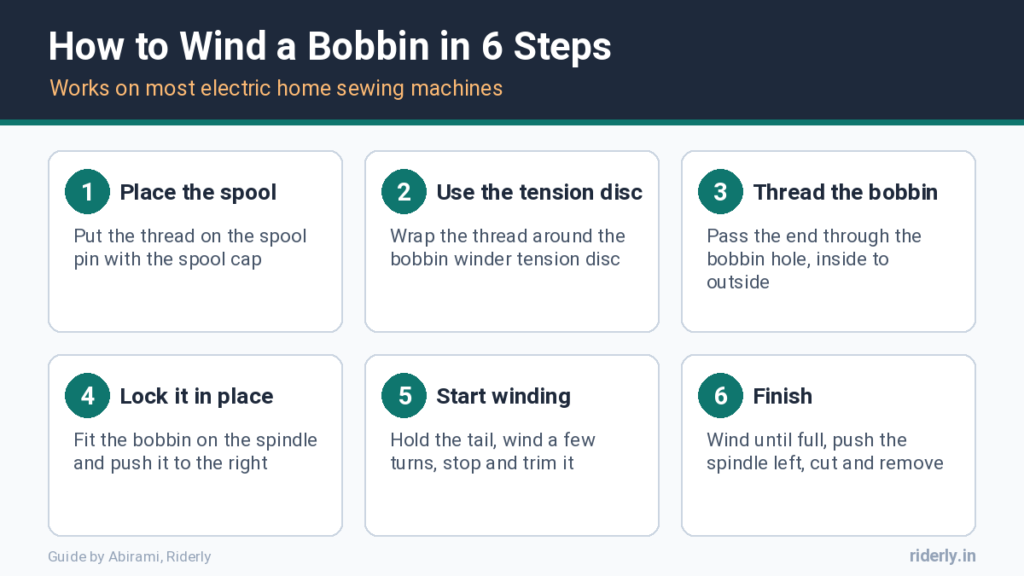
To wind a bobbin, place the thread spool on the spool pin, guide the thread around the bobbin winder tension disc, pass the end through the hole in an empty bobbin, fit the bobbin on the winder spindle and push it to the right, then hold the thread tail and run the machine until the bobbin is full. Push the spindle back to the left, cut the thread and remove the bobbin before you start sewing.
- Use an empty bobbin of the type your manual lists
- Always pass the thread through the bobbin winder tension disc
- Trim the starting tail after a few turns
- Wind at a steady medium speed
- Push the spindle back to the left, or the needle will not move
What You Need to Wind a Bobbin
- An empty bobbin that matches your machine. Metal or plastic, and the right size, as your manual says
- The thread you will sew with. Use the same thread on top and in the bobbin for most work
- Your machine manual or the bobbin winding diagram printed on the machine
- Small scissors to trim the tail
Bobbins look alike but differ in height and width between brands and models. A bobbin that does not fit correctly causes skipped stitches and loops, so buy spares that are listed for your model.
How to Wind a Bobbin on an Electric Sewing Machine
These steps follow the bobbin winding section of the Janome instruction book and the Penn State Singer quick start. Most electric machines from Usha, Singer and Brother use the same order.

- Place the spool on the spool pin and fit the spool cap or holder so it does not wobble.
- Guide the thread through the upper thread guide and wrap it around the bobbin winder tension disc. This disc keeps the winding firm.
- Pass the thread end through the small hole in the bobbin from the inside to the outside, if your bobbin has a hole.
- Fit the bobbin on the bobbin winder spindle and push the spindle to the right until it clicks.
- Hold the thread tail and press the foot pedal or start button. After a few turns, stop and cut the tail close to the bobbin.
- Wind until full. Many machines stop on their own when the bobbin is full. Janome also says to set the speed slider to fast for winding where the machine has one.
- Push the spindle back to the left, cut the thread and take the bobbin off.
Do not move the spindle while the machine is running. On most machines the needle does not move while the bobbin winder is engaged, and the machine will not sew until you push the spindle back.
How to Wind a Bobbin on a Hand-Operated Machine
Hand-operated and treadle machines, such as the classic Usha and Singer straight stitch models, have the bobbin winder near the handwheel. The steps are similar, with one extra step: you release the handwheel so the needle stays still.
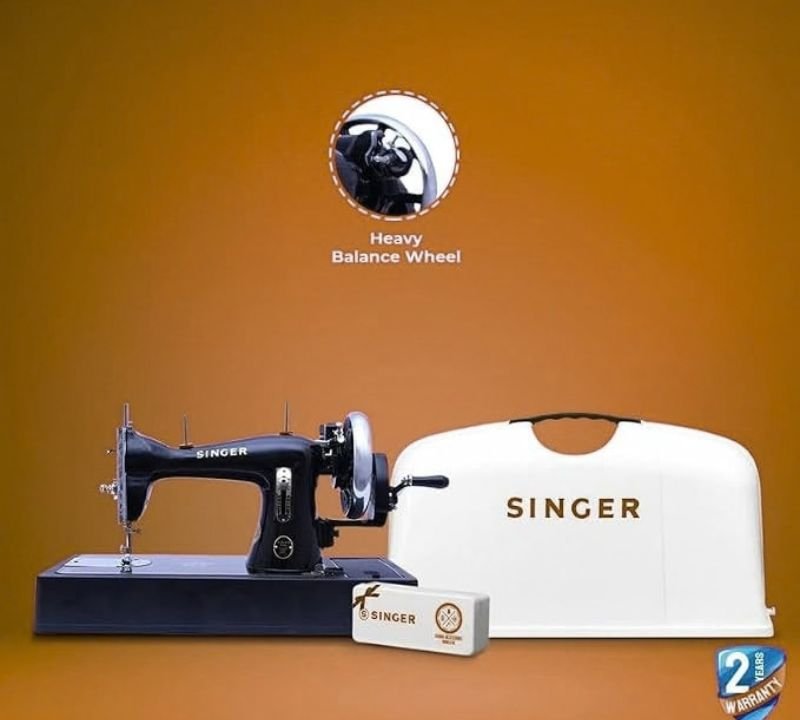
- Loosen the stop motion knob, the small knob in the centre of the handwheel, by turning it toward you. The handwheel now turns without moving the needle.
- Place the bobbin on the winder spindle and press the winder down so its rubber ring touches the handwheel.
- Guide the thread from the spool through the winder thread guide and wind a few turns onto the bobbin by hand.
- Turn the handle at a steady speed. The winder lifts off by itself when the bobbin is full on most models.
- Tighten the stop motion knob again before you sew.
If your machine looks different, check the manual. Not sure which type you own? See types of sewing machines.
How to Wind a Bobbin on a Mini Sewing Machine
Mini machines have a small winder pin on top. The manual for one common mini machine gives this order: place the spool, wrap the thread around the winder tension disc, push the bobbin onto the winder pin and slide it right, wind a few turns by hand, then run the machine on the slow setting until full. Slide the winder back before sewing. Our guide on how to use a mini sewing machine covers the rest of the setup.

How to Tell if a Bobbin Is Wound Correctly

Press the wound thread with your thumb. It should feel firm and even. A soft, spongy bobbin or one with thread piled on one side will cause loose stitches and loops under the fabric. Unwind it and start again rather than using it.
Bobbin Winding Problems and Fixes
- Loose or spongy winding: the thread missed the bobbin winder tension disc. Re-guide it and wind again.
- Thread piles up on one side: the thread path is off line. Check the guide and that the bobbin is pushed fully onto the spindle.
- Bobbin does not turn: the spindle is not pushed fully to the right, or on hand machines the winder ring is not touching the wheel.
- Thread winds under the bobbin onto the spindle: the bobbin was not seated. Cut it free and fit the bobbin again.
- Machine will not sew after winding: push the spindle back to the left, or tighten the stop motion knob on a hand machine.
- Bobbin overfills: stop the machine when the thread reaches just inside the rim.
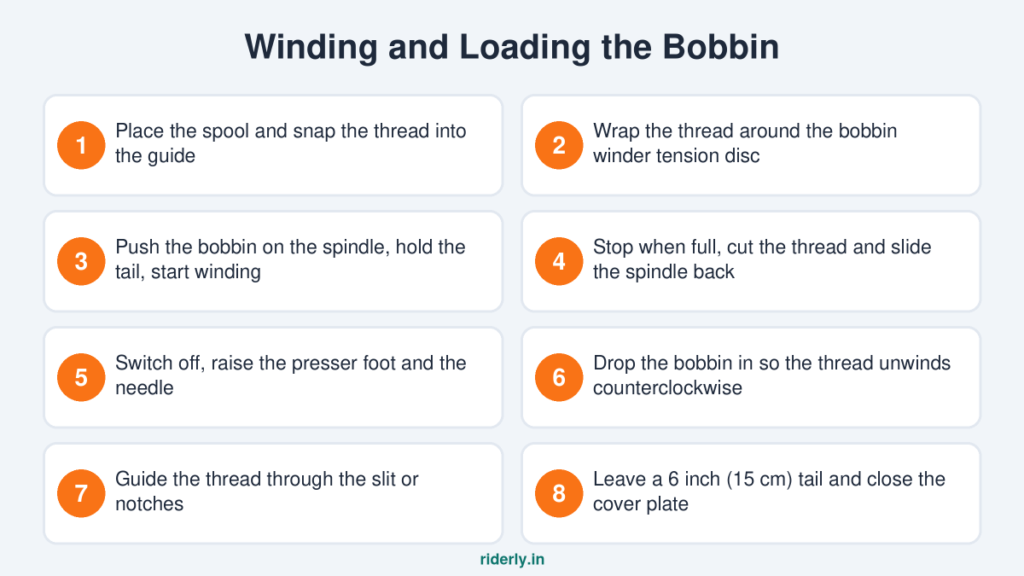
Once the bobbin is ready, follow our guide on how to thread a sewing machine to insert it and bring the bobbin thread up.
Sources and Further Reading
This guide is based on published manufacturer manuals and reference pages. Riderly has not tested every machine mentioned.
Frequently Asked Questions About Winding a Bobbin
Place the spool on the pin, wrap the thread around the bobbin winder tension disc, pass the end through the bobbin hole, fit the bobbin on the spindle and push it right, hold the tail, run the machine until full, then push the spindle left and cut the thread.
The thread is not passing through the bobbin winder tension disc. Guide it around the disc as the diagram on your machine shows and wind again.
On a hand machine the stop motion knob is still tight. Turn it toward you to release the needle. On an electric machine, check that the spindle is pushed fully to the right.
No. Bobbins differ in size and material. Use the bobbin type your manual lists, because the wrong bobbin causes loops and skipped stitches.
For most sewing, yes. Using the same thread on top and in the bobbin keeps the tension balanced and the stitches even.
Wind until the thread is just inside the rim of the bobbin. Many machines stop automatically. An overfilled bobbin does not turn freely.
The bobbin winder is still engaged. Push the spindle back to the left, or tighten the stop motion knob on a hand-operated machine.
You can, but it is hard to keep the tension even. Hand-wound bobbins are often soft and cause loose stitches. Use the machine winder when you can.
Final Verdict
Bobbin winding takes less than a minute once you know the order: spool, tension disc, bobbin hole, spindle right, wind, spindle left. A firm, evenly wound bobbin prevents many stitch problems later. Next, learn how to thread a sewing machine, and if you are still choosing a machine, compare models in our Top 10 Best Sewing Machine For Home In India.

Hi, I’m Abirami. I have many years of hands-on experience in sewing and tailoring, from stitching everyday clothes and blouses to doing alterations at home. I write Riderly’s sewing machine reviews and guides, and I use that experience to judge which machines are easy to thread, stitch cleanly and suit Indian homes and beginners.